
How 2 Grow Microgreens: From Beginner to Advanced
I’ve been growing microgreens for 2 years now and still marvel at the beautiful lush blankets of uniform seedlings. They’re easy and exciting to grow but also fun to eat! Every meal I sprinkle a few on top for that added flavor, texture, and dense nutrition. Plus it makes you look fancy!
Disclosure: This post may contain affiliate links, meaning I get a commission if you decide to purchase through my links, at no cost to you.
Disclaimer: These statements have not been evaluated by the Food and Drug Administration and are not intended to diagnose, treat, cure or prevent any disease. If you are pregnant, nursing, taking medication, or have a medical condition, consult your physician before consuming.
WHAT ARE MICROGREENS?
Microgreens are edible seedlings packed with flavor & dense nutrition. They are harvested shortly after the first set of leaves develop, usually around 7-10 days from when they were planted. They are simple to grow indoors year-round and add a burst of flavor and color to salads, sandwiches, and any other dish.
These tiny but mighty greens pack a nutritional punch! Studies have shown that they are loaded with nutrients like sulforaphane, beta-carotene, magnesium, zinc, and Vitamins C, B Complex, and K. As much as 40% more nutrition than their fully-grown counterparts! Of course, microgreens couldn’t fully replace mature vegetables but they do fill in other gaps in your dietary needs.
If you like microgreens from the store or farmers market, you will be blown away at the taste and texture of freshly harvested greens from your own kitchen! It’s truly unmatched.
MY MICROGREEN JOURNEY
IN 2020 A dear friend casually mentioned Microgreens as a great resource for food storage and survival prepping. I loved the idea of adding something living and quick to my food supply if grocery stores ever had major supply issues. So, I jumped down the rabbit hole of how to get started… and boy was I OVERWHELMED!
There were plenty of step-by-step guides but they left me on my own to figure out all the supplies and seeds needed. The whole concept was getting expensive and complicated so I just gave up.
Then almost a year later as produce at the store was really struggling in availability and quality, I finally ordered this kit and it lit the fire!
Side note: I don’t recommend this kit as your introduction to Microgreens. These trays are simply too big and deep for a beginner or even someone experienced whose just feeding their family.
Microgreens quickly turned this black thumb into Midas’s touch. They gave me quick success which inspired the confidence to explore other gardening avenues. Now I have a weekly rotation of Microgreens, two indoor hydroponic gardens, a thriving outdoor herb garden during the summer, and hopefully soon a big vegetable garden!
My goal is to help everyone experience the goodness of Microgreens and empower you to grow confidently!
Every microgreen grower has their own unique approach to the craft. Below is what I have learned through my own experience and conversations in online microgreen groups.
Most importantly, don’t let the pursuit of perfection prevent you from getting started - growing microgreens is easy and can be a fun and rewarding experience. I'm here to help you get started and reduce any feelings of overwhelm.
HOW TO START GROWING MICROGREENS
I am going to break this down into three stages of starting a microgreen journey, including links, instructions, and best practices.
1 - THE FIRST TASTE
Start with a simple, inexpensive kit to experience the process and taste the flavors. Most kits will include a tray, water sprayer, soil, seed, and instructions. There are some really fancy kits out there, like this beautiful one, which are great turnkey solutions but the upfront investment is higher and future costs add up if you’ll be growing more consistently due to their proprietary design.
Of course I love the simple kits I make, but here are a few others that would provide you with a great start:

How2Hailey Microgreen Starter Kit
Pros: Inexpensive (around $15), supplies for 2 harvests of 2 different organic varieties. The reusable small tray is perfect for windowsills and small-scale growing. Beautiful gifts and supports small business.

Back to the Roots Grow Kit - Ceramic
Pros: Inexpensive (around $15), ceramic reusable tray (love this!), organic
Cons: Only has supplies for 1 batch, no seed varieties to choose from, no lid

Back to Roots Grow Kit - Compostable
Pros: Great value per harvest - 6 harvests of 3 varieties, organic
Cons: Moderately priced (around $30), single use disposable trays, no lids

Pros: Reusable 10x10 standard trays, supplies for 4 harvests of 4 varieties. Best value per growth
Con: Higher priced (around $40)

Pros: Reusable larger tray, supplies for 3 harvests of 2 varieties, most fool proof
Cons: Proprietary system of seed quilts (gets costly), Higher priced (around $40)

Pros: Reusable tray, Supplies for 4 harvests each of different seeds, organic
Cons: Higher priced (around $40), proprietary trays using custom jute mats
How2Hailey’s Pick: For an inexpensive small-scale start & gifts, my kit is the way to go (and yes, I know I am biased)!
Otherwise, the Skyhaven Harvest kit would be my next pick if you anticipate really getting into microgreens as the trays and sprayer will serve you well as you scale up production.
WHICH SEEDS TO START WITH:
Easy: Arugula, Broccoli, Cabbage, Kale, Kohlrabi, Mustard, Parsley, Radish, Salad Mixes, Wasabi, Wheatgrass
Moderate: Dill, Leek, Nasturtium, Peas, Sunflower, Swiss Chard
Advanced: Basil, Beet, Cilantro (these all have long germination and time-to-harvest timeframes)
I recommend starting with my Broccoli/Salad Mix kit and Pea/Sunflower kit to give you exposure to two growing methods and types of greens (Sunflower & pea are larger, more crunchy greens that require a soaking period to start). From there, use my seed refill packs to experiment with the more unique or advanced seed options until you’re comfortable expanding your growing volume.
THE GENERAL GROWING PROCESS FOR BEGINNERS
PREPARE THE WATER & SOIL, POSSIBLY SOAK THE SEEDS
Learn the seed’s needs: Each seed has different germination or preparation requirements. In general, most germinate in 5 days and are ready to harvest in 8-10 days. Pay close attention to the instructions on your seed packet to see the needs of that plant.
Soaking: If using larger or harder seeds (e.g. beet, nasturtium, parsley, pea, sunflower, swiss chard, or wheatgrass) you will need to soak the seeds beforehand. Pay close attention to the instructions on your seed packet to see if soaking is needed and for how long.
Soil: If using soil pellets, remove any wrapping and reconstitute them with water and allow them to expand - your soil should be damp but not soaked. Fill your tray 1/4-1/2 inch from the top with soil. Evenly spread the soil across the tray.
Water: Fill the sprayer with filtered water. Tip: Add a dash of hydrogen peroxide to reduce the chances of mold, this is especially helpful for harder seeds.
PLANT & GERMINATE THE SEEDS
Sow seeds evenly on top of the soil, no need to bury them. Spritz the seeds lightly with water. Cover the tray LOOSELY with a lid or another tray and place it on a counter or somewhere with little light.
Check on your seeds daily and spritz lightly as needed to keep the soil damp.
After 3-5 days remove the lid and move your plant near a window or other light source.
GROW & HARVEST
Continue watering your plants daily to keep the soil damp. Most microgreens are ready to start harvesting around days 8-10 when they’ve reached about 2 inches tall.
Harvesting: Using clean scissors, at the base of the plant just above the soil cut off only what you need. Leave the rest of your greens to continue growing until you’re ready to harvest more in the next few days. Try to harvest all by day 12 to maintain the best flavor.
Storage: Cut greens can be stored in the fridge in a sealed container lined with a paper towel. However, they only last a few days (sunflower and pea last a week), so for the best texture and flavor try to harvest fresh every time.
Preparing for the next batch: Once you’ve enjoyed all your microgreens, discard the soil and roots (they make great compost). Your greens won’t grow back once cut (with the exception of grass varieties), and the soil shouldn’t be reused as that increases the risk of mold or bacterial growth. Wash the tray with soap and water, and start a new batch!
COMMON TROUBLESHOOTING
Seeds Not Germinating: They may not have enough water or maybe have too much water. Keep your soil damp to the touch and never flooded. It may also be too cold if sowing in the winter, so move them away from the window while they germinate.
Yellow Leaves: Freshly sprouted seeds look yellow after germination, they will turn beautifully green once exposed to light.
Drooping Greens: If your greens were doing great and suddenly droop, that means they are thirsty! Give them a good watering (but not too much) and they will perk back up in a few hours.
Root Hairs vs Mold: During germination, you may notice lots of tiny white hairs, these are root hairs and that’s good! However, if your tray starts to smell funky and you have loose spider-web strings, that’s an indication of mold starting. You can spray with hydrogen peroxide to treat the earlier signs or dump the tray and start again. This can happen due to too much moisture, not enough airflow, and/or too densely seeded (which reduces airflow). We will explore the mold topic more toward the end of this article.
Heads up, this next section may feel overwhelming if you haven’t grown microgreens before. Come back and read this after you’ve experimented with one of the starter sets above.
2 - MOVING ON TO MORE GROWING
Now that you’ve successfully grown a few batches in your starter kit and fallen in love, here’s how to keep growing. This is a good time to incrementally start upgrading your growing supplies - such as larger trays, a higher volume of soil, and a variety of seeds.
TRAYS:
I recommend staying within a 10-inch tray or smaller. These are more manageable both in space and growing materials, but also the smaller surface area reduces mold risk. I also recommend choosing something you’ll be able to buy more of if you choose to continue this habit. I have about eight 10-inch trays and have 3 growing in succession most weeks.
Small 4-6 inch trays are great for things like herbs, spicy veggies, or unique varieties that you’ll be garnishing with vs eating a bowl of.
Medium 8-10 inch trays are great for salad-base greens such as sunflower, pea, salad mix, or broccoli.
Note: You’ll find trays with and without holes options, I personally prefer “without” holes and just water close to the base of my plants.
These trays from Bootstrap Farmer are the most popular ones amongst microgreen growers for their quality, durability, & shallow depth:

Bootstrap 5x5 Trays (less than $1 per tray)

Bootstrap 10x10 Trays (approx $3 per tray)

Bootstrap 10x20 Tray (approx $15 per tray)
SEEDS:
It’s most economical to buy seeds in bulk 1lb or 5lb bags. Stock up on your favorite seeds and experiment in smaller quantities with other varieties. Fortunately, seeds have a long shelf life of 2-5 years. I order almost all my seeds from True Leaf Market (referral link to get you $ off). They have an excellent selection of organic and conventional seeds, and most are non-GMO heirlooms. It also gives me peace of mind knowing they are USA grown.
Here are some great seed varieties to experiment with:

True Leaf Marked 12, 1oz Seed Variety
Approx $30

True Leaf Market Basic Doze, 4oz
Approx $80 when in stock

True Leaf Market Colorful Assortment 8, 4oz
Approx $65 when in stock
Seeding Rate: This means how many seeds you need per standard 10x20 tray, and it initially had me so unnecessarily worried! Each seed type has a different “seeding rate” which is the recommended amount of seeds to sow for the proper density. Too dense of seeds can increase your risk of losing a tray to mold. Too few seeds just feels like a waste of soil and space.
When looking online or on your bags it will say something like “seeding rate 1020: 1oz” In general, most small seeds like salad mixes are a 1oz rate, Sunflower is about 9oz, and peas are around 5oz. You’ll have to do a little math to accommodate smaller tray sizes - like a 10x10 tray needs 1/2 oz of salad seeds or a 5x5 tray needs 1/4oz. Regardless, if your weights are under/over a little bit it’s not the end of the world.
For reference, 1oz of most smaller seeds would get you 5-8 harvests in my small 4” starter kit or 2-3 harvests in a 10x10 tray.
SOIL:
Coco Coir pellets (like what is used in my kits) are very convenient for small trays. However these do get pricey when filling larger trays, so using 1.4lb bricks is more economical and you can just hydrate what you need (video coming soon). In our house, we use coco coir because it’s sterile soil - meaning it won’t have hitchhikers tagging along to infest my hydroponic gardens. It is also PH and EC (Electrical Conductivity, meaning nutrients) balanced, eco-friendly, and doesn’t take up much room at all.
Jute felt and other soil-free methods often referred to as Hydroponic are also good options. I have tried a few and have had the most consistent success with Coco Coir.
You can also use just basic, inexpensive potting soil.

Multiple sizes and quantities are available. One 40mm puck expands to 3/4 cup of soil! This pack of 30 pucks is around $20

Legigo Coco Coir Bricks, 10 Pack
This is the most economical option I have found and it provides great results! 1 brick makes about 2 gallons of soil.

Jute Grow Mats for 10x20 Trays, 10 Pack
Can easily be cut down to fit 10x10 and 5x5 trays. Convenient for storage and a decent value if you can find a sale.
NUTRIENTS & FERTILIZERS:
Since you are harvesting your greens in a seedling state, it’s not necessary to add nutrients or fertilizers to your soil. The seeds contain all the needed nutrients for the seedling’s first few weeks of life. Some growers like to experiment with adding different nutrients, but again it’s not a necessary part of a successful grow.
LIGHTS:
You can absolutely still use a windowsill or kitchen countertop exposed to regular lightbulbs for small-scale growing. But if you want to speed up growth try exploring artificial lighting. Fortunately, in this seedling stage, you don’t need very powerful or expensive grow lights.
Light Timing: Never expose your microgreens to constant 24-hour lights as this can cause leaf distortion and over-exhaust the plant. They need a resting period of about 6 hours to strengthen their roots. I have mine on a timer to come on at 5 am and turn off at 10 pm, giving them 6 hours to rest overnight.

Barrina T5 Grow Lights, Full Spectrum, 2ft 80W
Often on sale for around $50. This is the set I have in the “pinkish white” hue and they’re the perfect size for a 10x20 tray or two 10x10 trays. Mine are mounted under a bookshelf.

Frequently $20 or less, this is a great option for clipping onto a counter or shelf and have movable lights.

At around $30, this is a great option if you’re going to continue with smaller-scale kits (like the How2Hailey starter kits) but don’t have a great light source.
WATER
Never had I ever measured the PH or EC of the water I give my microgreens. Some commercial growers swear by it, but as someone growing just a few batches a week for my family, I have not noticed any issues using our filtered tap or reverse osmosis water.
Consider upgrading to a larger spray bottle and a small watering can. When doing large trays I use a 7oz spray bottle during the germination phase. But once the seeds pass an inch in growth, I switch to a small watering can and water at the roots instead of from the top. Focusing on the roots helps reduce the amount of moisture sitting on the leaves and stems which could lead to mold, especially in larger trays.
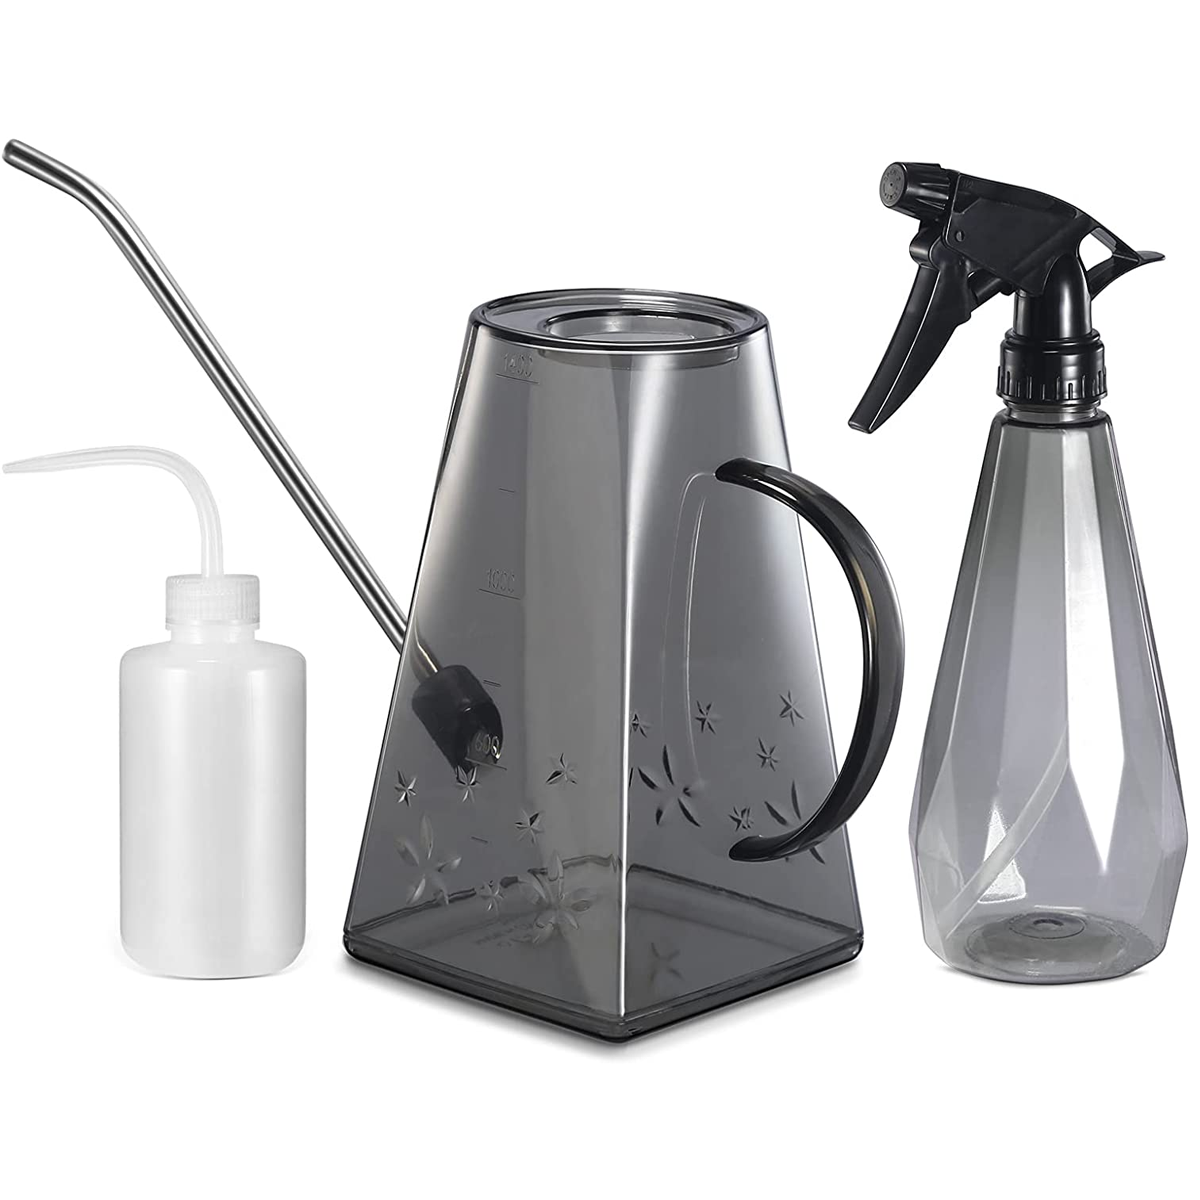
Watering Can, Spay & Squeeze Bottle Set
Just get this set, it’s perfect and inexpensive at around $15.

About $10. These are what we use, but any spray bottle would do.

8 Oz Amber Glass Spray Bottles
At about $10 these are a great glass option. We use these for Thieves cleaner and the sprayers have held up quite well.
GROWING TIPS TO INCREASE YOUR SUCCESS
Blackout and weigh down your trays during germination. Stack another tray on top of what you just planted and then add a rock or brick on top. This will stimulate being “buried” and drive the roots down into the soil which helps create really even growth (like the ones I post on Instagram often). Larger seeds and ones that needed soaking especially benefit from weights. Some seeds may stick to the bottom of the top tray when you go to water them, just leave them be and their roots will eventually find their way into the soil as they grow. Continue to water daily with a sprayer. After 3-5 days (for most greens) the greens will push the top tray up; this is the time to remove the top tray and expose your plants to light. They will be very yellow at first but will green up once they’ve been exposed to light for a few hours
Add a fan. Air circulation with a small personal fan pointed indirectly at your greens helps reduce mold and pests. It also helps strengthens your growing greens.
Develop a growing succession routine. I like to have a few trays growing at a time in a constant rotation so we always have a source of fresh greens. I typically start a fresh tray once my existing tray comes out of the blackout/germination phase. Or form a habit of starting a new tray every Sunday for the upcoming week.
LET’S TALK ABOUT MOLD
It has happened to every microgreen grower regardless of skill level. Sunflowers around day 6 are notorious for this, and tender salad greens as they near harvesting if they were too densely seeded and overwatered. If you catch the very first signs of mold early you can treat it with hydrogen peroxide. And while you can harvest around areas with mold, it’s still better to scrap the tray entirely because there could be mold spores in other areas of the crop. (Another reason why I prefer smaller trays).
But the best approach is to prevent mold altogether:
Hydrogen peroxide is your friend! This has been one of the most helpful tricks for me because it dramatically reduces mold risk. I add a dash of it into my spray bottle and watering can, and into the water if I am soaking seeds. Food-grade hydrogen peroxide is ideal and one bottle will last you a while. Hydrogen peroxide at a higher percentage can also be used to treat fist-signs of mold.
Bottom watering. Focus your watering at the soil level vs watering the leaves. This keeps the soil damp but the greens dry. When the greens are about an inch tall their roots have formed a strong web at the bottom of the tray. I just grab a fist full of greens to pull the soil up enough to stick my watering can spout underneath and gently set the soil back down. You can also experiment with stacking a tray with holes inside a tray without holes and watering in between the two and swapping out the bottom tray every few days to prevent stagnation.
Water less. I only check my greens AM and PM. Feel the soil and if it is getting dry give it a little drink. A 1020 tray shouldn’t need more than 1/2 cup of water at a time.
Circulate the air. Add small fans to get air movement in the area. I have one pointed indirectly at my shelves to keep the air flowing.
Disinfect everything. Before and after each use thoroughly wash your trays with soap and water. I like to spray hydrogen peroxide on them just in case. Wash your hands every time before you touch your greens. Use clean scissors every time you harvest.
Disinfect your seeds. This is especially effective for harder-shelled seeds like sunflowers and peas. For no-soak-required seeds give them a 5-minute bath in diluted hydrogen peroxide then strain, no need to rinse. For soak-required seeds add a dash of hydrogen peroxide to the water while they soak. This will not harm you or your seeds.
Don’t seed too densely. Admittedly I am guilty of this often but, fortunately, the above preventative measures have saved my trays. Seeding too densely will prevent proper airflow causing wet conditions to stick around which is the perfect breeding ground for mold. Pay attention to the recommended seed density on the packets (mentioned earlier) and err on the side on a thinner sowing.
3. Growing Pro
I often observe passionate individuals in various Microgreen communities who are eager to turn their love for Microgreens into a profitable business. While this endeavor can be rewarding, it requires a sizeable amount of effort and resources and the market is becoming more saturated. Although I won't be delving into the specifics of starting a Microgreen business in my blog, there are many helpful resources available online that provide a comprehensive guide to the process. For example, this one.
Conclusion
Overall, remember to have fun with it! Treat it like a science experiment and find what works best for you. I would love to see you grow, be sure to Tag me on Instagram @How2Hailey and use the hashtag #How2Grow